About the Audit Reports Page
Overview
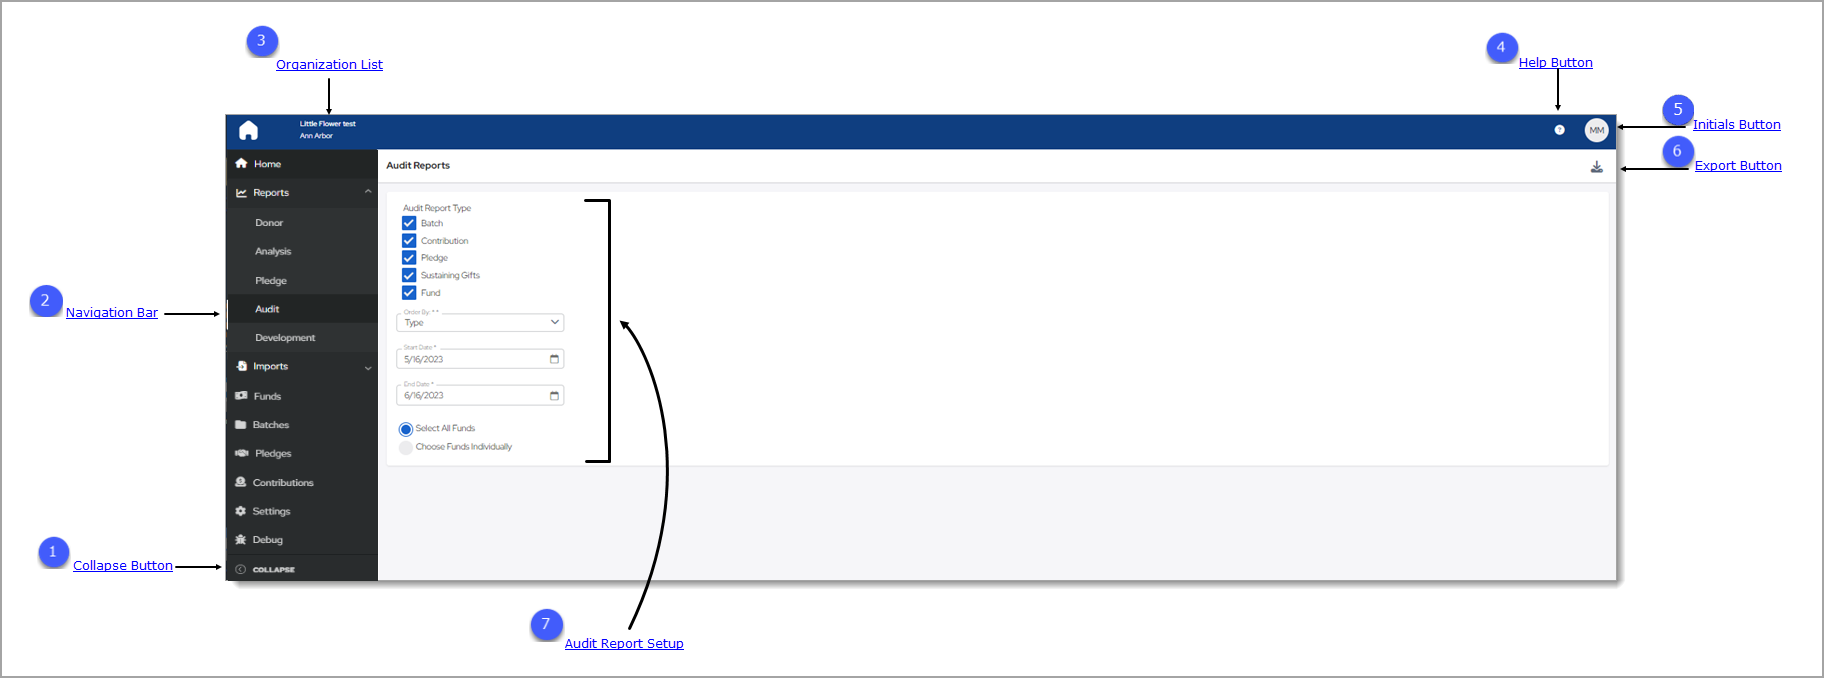
The Audit report allows you to view and monitor changes made to your organization's batch, contribution, and pledge data. The illustration below identifies the main elements on the Audit Reports page. Click a numbered to view a detailed description of the element.
To access the Audit Reports page, you must either have Organization Admin access rights tied to your login or Offering > Print permissions. If you do not have Offering > Print permissions, the Reports option is not visible in Offering menu in the navigation bar.
Access rights and permissions are granted to individual users in their staff records, accessed through the Manage Staff page in the Administration module. You must have Organization Admin rights to view Manage Staff page and assign permissions. For details, see the online Help for the ParishSOFT Administration module.
 Collapse Button
By default, the Navigation Bar is expanded, so the entire name of each page is visible. If you need more viewing space in the right panel, you can collapse the menu by clicking  . Doing so minimizes
the menu so that only the page icons are visible:
. Doing so minimizes
the menu so that only the page icons are visible:

To return the Navigation Bar back to the expanded position, click  (Expand). Note that the state (expanded or minimized) of the menu that you specify on any page stays the same
on all pages until you change it.
(Expand). Note that the state (expanded or minimized) of the menu that you specify on any page stays the same
on all pages until you change it.
 Navigation Bar
The Navigation Bar is the menu that sits on left side of the Audit Reports page (and on every other page in the module). The menu lists the module's primary pages and provides a way for you to quickly move from one page to another. When you want to view a specific page's content, simply select the page option.
 Organization List
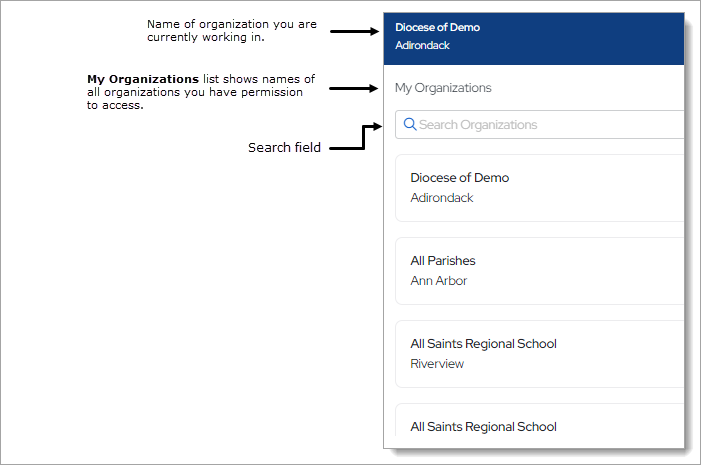
The Organization list is located above the Navigation Bar. By default, this dropdown list is closed and shows the name of the organization you are working in.
- If you have access to one organization, the list displays the name of your organization. The dropdown functionality is disabled because you have limited access.
- If you have access to multiple organizations, the list displays the name of the organization you are working on or last worked in. Select the organization’s name to display a list of all the organizations you have permission to access. If the list is long, you can either type the organization’s name into the Search Organizations field (see illustration below) or use your mouse to scroll through the list to find the organization you want and then select it.
 Help Button
Click  to access the Offering Help. The Help opens in a separate browser so that you can view it while working in the application. The Help provides
an overview of Development Manager's concepts and features and offers step-by-step instructions on how to perform specific Development Manager tasks.
to access the Offering Help. The Help opens in a separate browser so that you can view it while working in the application. The Help provides
an overview of Development Manager's concepts and features and offers step-by-step instructions on how to perform specific Development Manager tasks.
 Initials Button
This button shows the initials of the logged-in user. Clicking the button display the Log Out option. Click this option to log out of Offering.


 Export Button
Click ![]() (Export) to generate an Audit report. You can produce a report in these following formats:
(Export) to generate an Audit report. You can produce a report in these following formats:
- Excel: the Excel version uses the same data source as the PDF but may contain more data, which is presented in an .xls layout. Choose this option if you want to do a mail merge or if you want to import the data in the selected report into a spreadsheet program, such as Microsoft Excel.
- PDF: the PDF version is useful for most purposes because it extracts the most commonly needed data from the report and presents it in a well-designed layout. Note that the PDF contains less information than the .xls version and is a more suitable option when you need a document that is easily read.
 Audit Report Setup
The options used to set up an Audit report are listed below. Click the name of an option to expand it and view its description. For instructions on creating an Audit report, go to How to Create an Audit Report.
![]() An asterisk (*) indicates required information.
An asterisk (*) indicates required information.
Audit Report TypeAudit Report Type
Select the type of report you want to create. You can select one or more of the following:
- Batch: for the specified date range, tracks changes to batch records showing what was changed by whom and when.
- Contribution: for the specified date range, tracks changes to contribution records showing what was changed by whom and when.
- Pledge: for the specified date range, tracks changes to pledge records showing what was changed by whom and when.
- Sustaining Gifts: for the specified date range, tracks changes to sustaining gift records showing what was changed by whom and when.
- Fund: for the specified date range, tracks changes to fund records showing what was changed by whom and when.
Select the type of audit report you want to generate:
- By User: shows changes made by the selected staff user to the funds he or she has permission to change. For easier review, the information in this report is organized to bring all changes made by the selected user together.
- By Type:produces a report that includes all changes made to one or more of the following: batches, contributions, and pledges. For easier review, the information within a report is organized by information in the Type column, which indicates the type of change made to a record.
If you select the By User option, click ![]() to open
the Staff Search window. Use the Search filters (for example, First Name or Email) to find the user you want to audit. Click
to open
the Staff Search window. Use the Search filters (for example, First Name or Email) to find the user you want to audit. Click  to locate
the record.
to locate
the record.
Set a date range for the report by entering a start date in this field and a date in the End Date field (see next entry).
You can either type a date into the field or click ![]() and select a date from the displayed calendar.
and select a date from the displayed calendar.
If you want to find changes made on the same date, select the same date from the Start Date and End Date (see next entry) calendars.
Set a date range for the report by entering an end date in this field and a date in the Start Date field (see previous entry).
You can either type a date into the field or click ![]() and select a date from the displayed calendar.
and select a date from the displayed calendar.
If you want to find changes made on the same date, select the same date from the Start Date and End Date (see next entry) calendars.
Select All FundsSelect All Funds
Select this option to include audit data for all funds in the report.
Choose Funds IndividuallyChoose Funds Individually
Select this option to include audit data for specific funds in the report. A list of funds is displayed. Select the checkbox for each fund you want to include in the report.