 About the File Import Page
The File Import page gives you the ability to electronically post new pledges or contribution records into your system from your bank’s lockbox file thus eliminating the need for manual data entry.
The feature is ideal for organizations that use lockbox banking. Under this service, the bank receives all donor payments and pledges, processes them, and then deposits the monies directly into your organization's bank account. The bank captures the payment information in an electronic file (.csv format), which you can directly import into Development Manager.
To ensure that donor payments and remittance information is correctly read and posted, you must set up the lockbox service correctly. Proper setup requires collaboration with your organization, your banking institution, and ParishSOFT. To get started, contact the ParishSOFT Professional Services group for assistance. A consultant will work with you and your vendor to set up your lockbox service and help you test it to ensure that it is working correctly.
Permissions
Your organization must be licensed to use the Lockbox Imports feature. All active Development Manager users have access to import features.
Overview
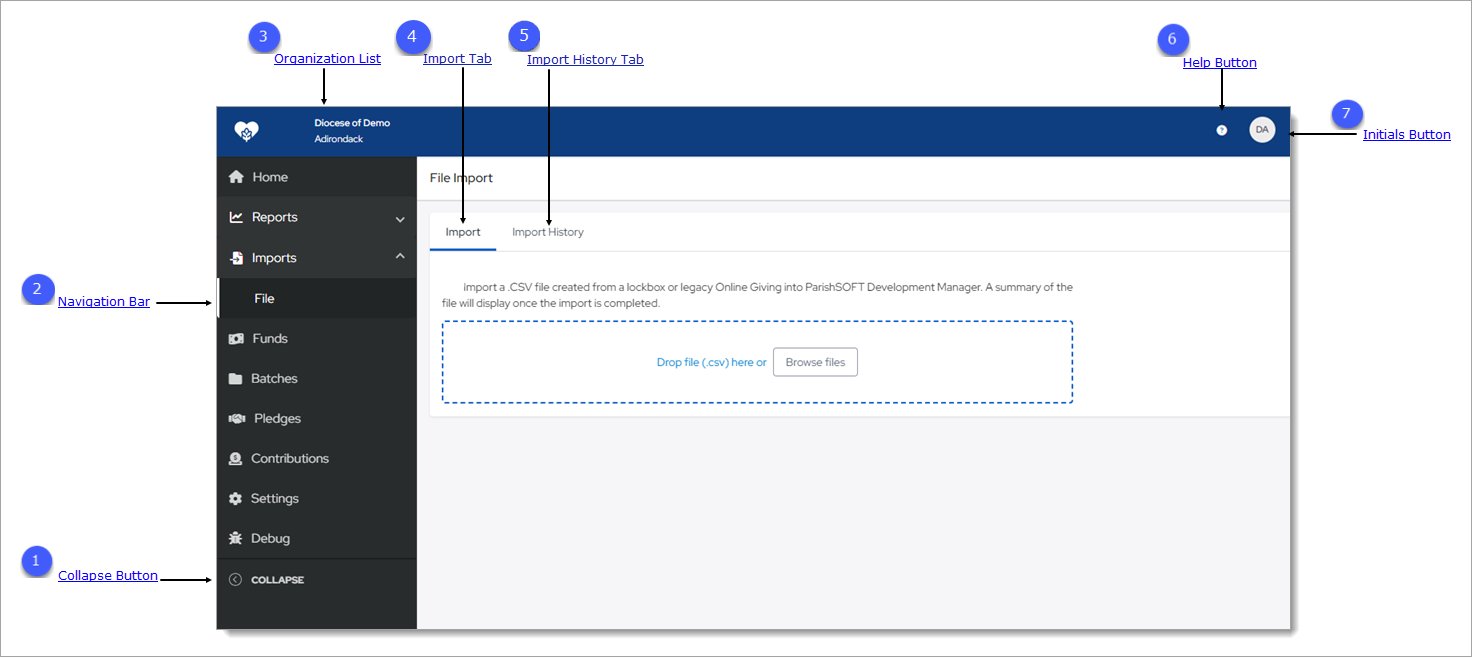
On the File Import page, you can import a lockbox file containing payment information into Diocesan Development Manager. The illustration below identifies the main elements on the File Import page. Click a numbered link in the illustration to jump to a detailed description of the element.
 Collapse Button
By default, the Navigation Bar is expanded, so the entire name of each page is visible. If you need more viewing space in the right panel, you can collapse the menu by clicking  . Doing so collapses the
menu so that only the page icons are visible:
. Doing so collapses the
menu so that only the page icons are visible:

To return the Navigation Bar back to the expanded position, click  (Expand). Note that the state (expanded or minimized) of the menu that you specify on any page stays the same
on all pages until you change it.
(Expand). Note that the state (expanded or minimized) of the menu that you specify on any page stays the same
on all pages until you change it.
 Navigation Bar
The Navigation Bar is the menu that sits on left side of the File Import page (and on every other page in the module). The menu lists the module's primary pages and provides a way for you to quickly move from one page to another. When you want to view a specific page's content, simply select the page option.
 Organization List
The Organization list is located above the Navigation Bar. By default, this dropdown list is closed and shows the name of the organization you are working in.
- If you have access to one organization, the list displays the name of your organization. The dropdown functionality is disabled because you have limited access.
- If you have access to multiple organizations, the list displays the name of the organization you are working on or last worked in. Select the organization’s name to display a list of all the organizations you have permission to access. If the list is long, you can either type the organization’s name into the Search Organizations field (see illustration below) or use your mouse to scroll through the list to find the organization you want and then select it.

 Import Tab
The Import tab is where you import lockbox files to Development Manager. Use either of the following methods to import your files:
![]() In the list below, click the arrowhead next to an option to expand it and view its description.
In the list below, click the arrowhead next to an option to expand it and view its description.
Use this procedure to drag and drop a file:
- Find the file on your computer that you want to import.
- Select the file but do not release the mouse button. Then, while holding button drag the file to the Drop file here area (see the previous illustration).
- Release the mouse button to import the file.
Browse files ButtonBrowse files Button
Use this procedure to browse files:
- Click
 .
. - Find the file you want to import. Then, select it. Note that batch files are not required to have unique names.
- Follow your browser's procedure to import the file into Development Manager.
The name of the imported file appears in the Import field.
The required file type for the import file is .csv.
After a file is imported, the system displays a summary of its contents. Use the information provided in the summary to verify the accuracy of the pledges in the imported file.
 Import History Tab
The system creates an summary report for each imported file. Click this tab to view a list of reports containing details for previously imported files. To download a report to your computer, click its link.
 Help Button
Click  to access the Development Manager Help. The Help opens in a separate browser so that you can view it while working in the application. The Help
provides an overview of Development Manager's concepts and features and offers step-by-step instructions on how to perform specific Development Manager tasks.
to access the Development Manager Help. The Help opens in a separate browser so that you can view it while working in the application. The Help
provides an overview of Development Manager's concepts and features and offers step-by-step instructions on how to perform specific Development Manager tasks.
 Initials Button
This button shows the initials of the logged-in user. Clicking the button display the Log Out option. Click this option to log out of Development Manager.

Related Topics