 About the Settings Page
Overview of the Settings Page
The Settings page contains options you can set to configure settings that control the behavior of Offering and users' preferences when interacting with the application.
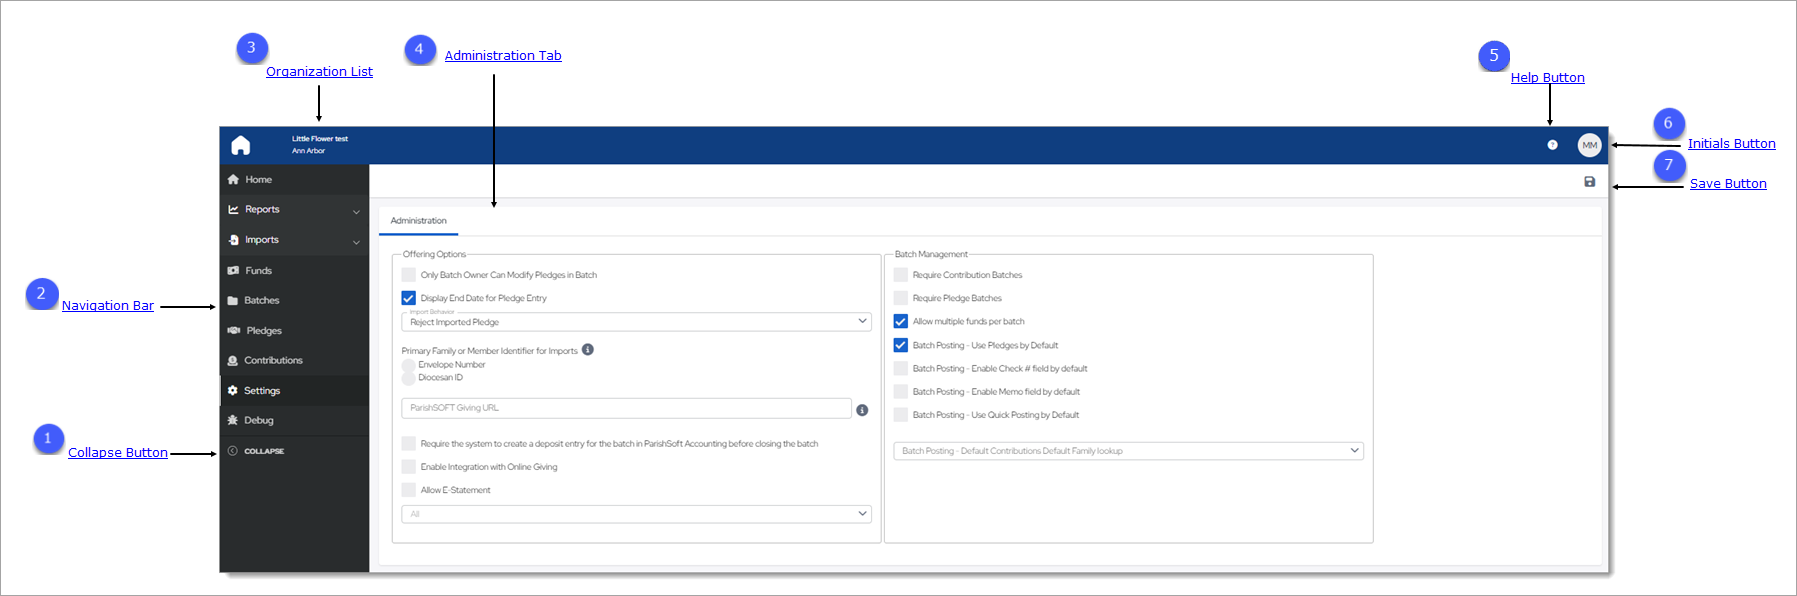
The illustration below identifies the main elements on the Settings page. Click a numbered link to jump to a detailed description of an element.
You must have Organization Admin access rights to view the Settings page.
 Collapse Button
By default, the Navigation Bar is expanded, so the entire name of each page is visible. If you need more viewing space in the right panel, you can collapse the menu by clicking  . Doing so minimizes the
menu so that only the page icons are visible:
. Doing so minimizes the
menu so that only the page icons are visible:

To return the Navigation Bar back to the expanded position, click  (Expand). Note that the state (expanded or minimized) of the menu that you specify on any page stays the same
on all pages until you change it.
(Expand). Note that the state (expanded or minimized) of the menu that you specify on any page stays the same
on all pages until you change it.
 Navigation Bar
The Navigation Bar is the menu that sits on left side of the Settings page (and on every other page in the module). The menu lists the module's primary pages and provides a way for you to quickly move from one page to another. When you want to view a specific page's content, simply select the page option.
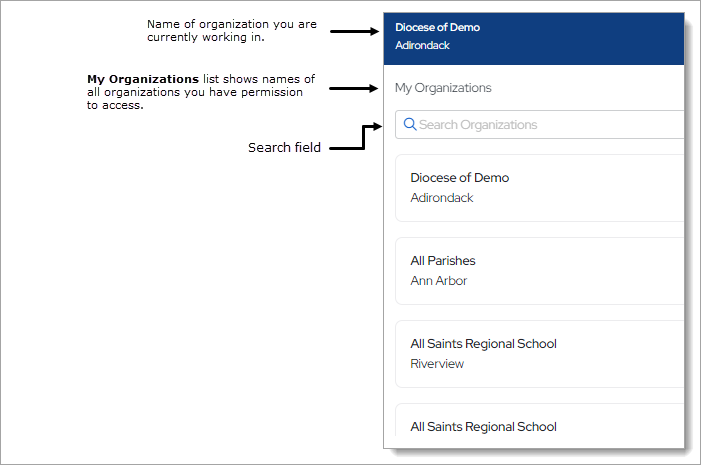
 Organization List
The Organization list is located above the Navigation Bar. By default, this dropdown list is closed and shows the name of the organization you are working in.
- If you have access to one organization, the list displays the name of your organization. The dropdown functionality is disabled because you have limited access.
- If you have access to multiple organizations, the list displays the name of the organization you are working on or last worked in. Select the organization’s name to display a list of all the organizations you have permission to access. If the list is long, you can either type the organization’s name into the Search Organizations field (see illustration below) or use your mouse to scroll through the list to find the organization you want and then select it.
 Administration Tab
Click Administration to display the Administration tab. This tab is has two main sections:
Offering Options
The options in the Offering group are used to configure Offering. Use the checkboxes to enable or disable options. When a checkbox is selected, it appears as checked and the option is enabled. Note that some options are pre-selected by default. You can deselect (disable) them by clicking your mouse inside the checkbox.
Options in the Offering Options group are listed below. Click name of an option to view its description.
Only Batch Owner Can Modify Pledges in BatchOnly Batch Owner Can Modify Pledges in Batch
The person who initially creates a batch is considered the rightful owner. This checkbox has two settings:
- Selected: only the batch owner can change pledges in a batch.
- Not selected (the default): users with the appropriate batch permissions, including users who do not own the batch, can make modifications to pledges in batches.
Display End Date for Pledge EntryDisplay End Date for Pledge Entry
The end date is the last date that payments can be posted to a pledge. This checkbox has two settings:
- Selected: the End Date field is displayed the pledge form for data entry.
- Not Selected: the End Date field is not displayed in the pledge form for data entry.
Import BehaviorImport Behavior
The options in this dropdown list give you finer control over how the import process handles lockbox imports and contributions coming into the system from Online Giving. Select one of the following:
- Add Imported Pledge: the import process performs no validation checks for an additional active pledge. An active pledge is one with an end date that is either NULL or after today.
- Reject Imported Pledge: the import process checks for an additional active pledge associated with the same fund and family. If a pledge matching this criteria is found, the process returns an error informing the user that
an active pledge exists for the donor. An active pledge is one with an end date that is either NULL or after today.
- Update Existing Pledge to Match Import: the import process checks for an additional active pledge. If one is found, it adjusts the existing pledge by the amount of the imported pledge. If a contribution is attached to the pledge, the contribution is posted to the existing pledge with the Initial Contribution checkbox deselected.
Primary Family or Member Identifier for ImportsPrimary Family or Member Identifier for Imports
Select your organization's primary method for associating contributions in generic import files with donors in their database:
- Envelope Number: uses the envelope number to associate imported contributions to donors.
- Diocesan ID: uses the identifier assigned by the diocese to associate imported contributions to donors.
ParishSOFT Giving URLParishSOFT Giving URL
In this field, type the URL your parish uses to receive donations through ParishSOFT Giving.
Select the checkbox to require a deposit transaction for the batch to be made into ParishSOFT Accounting before allowing the batch to be closed.
Enable Integration with Online GivingEnable Integration with Online Giving
Select the checkbox to activate the integration between the ParishSOFT Offering and Online Giving systems. After the two systems are connected, the Import > Integration page is visible to parish users, enabling them to import pledge and contribution records from Online Giving into Offering.
![]() This setting does not affect ParishSOFT Giving or Digital Offering.
This setting does not affect ParishSOFT Giving or Digital Offering.
Allow E-statementsAllow E-statements
Select the checkbox to allow E-statements. Then, select the year access to E-statements will end. Access ends on December 31 of the selected year. If you select All, E-statements are accessible for any year up to and including
the present year.
Batch Management Options
The options in the Batch Management group are used to govern batch control in Offering. Use the checkboxes to enable or disable options. When a checkbox is selected, it shows a checkmark to let you know that the option is enabled. Note that some options are pre-selected by default. You can deselect (disable) them by clicking your mouse inside the checkbox to remove the checkmark.
Options in the Batch Management group are listed below. Click the name of an option to view its description.
Require Contribution BatchesRequire Contribution Batches
Controls a batch is required for posting contributions to Offering. This option has two settings:
- Selected (the default): all contributions must be posted by batch.
- Not selected: batches are optional (not required for posting contributions).
Require Pledge BatchesRequire Pledge Batches
Controls whether a batch is required for posting pledges to Offering. This option has two settings:
- Selected (the default): all pledges must be posted by batch. You cannot post a pledge outside of a batch.
- Not selected: batches are optional (not required for posting pledges). You can post a pledge outside of a batch.
Allow multiple funds per batchAllow multiple funds per batch
Controls whether a batch can contain pledges or contributions for different funds. This option has two settings:
- Selected: the account setup on the batch is the default fund for new pledges and contributions. However, you can override the fund as needed at the individual pledge or contribution level.
- Not Selected: all postings in a batch must be to the same fund.
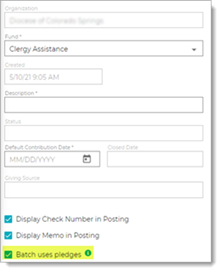
Batch Posting - Use Pledges by DefaultBatch Posting - Use Pledges by Default
Lets a user with the appropriate permissions set the default value of the Batch uses pledges checkbox in the setup for all new batches (for a description of Batch uses pledges checkbox, go to Batch Record Details).
This option has two settings:
- Selected: as illustrated in the batch data entry form below, sets the default value of the Batch uses pledges checkbox to "true" (checked) for all new batches. When the value is "true", the system searches the database to locate a pledge to match contributions to before posting them to a batch. If a matching pledge is found, the system links it to the contribution and displays the pledge icon next to the contribution record in the batch.
![]() Depending on the number of pledges in your database, selecting this option can slow data entry because the system needs time to locate a matching
pledge.
Depending on the number of pledges in your database, selecting this option can slow data entry because the system needs time to locate a matching
pledge.
- Not selected: in the data entry form for new batches, sets the default value of the Batch uses pledges checkbox to "false" (unchecked) for all new batches. When the value is "false", the system does not search the database for a pledge to match posted contributions to. Contributions posted to batches are not linked to pledges, and no pledge icon is displayed next to contribution records in batches.
![]() IMPORTANT
IMPORTANT
A user can overrided the default value of the Batch uses pledges checkbox locally within a specific batch. This is easily done by changing the checkbox value in the batch from checked to unchecked, and vice versa. However, the user must make such a change before saving the batch because the system does not allow changes after a batch is saved. Additionally, a change made locally applies to the specific batch only.
Batch Posting - Enable Check # field by defaultBatch Posting - Enable Check # field by default
A global control that determines whether the Check Number field is displayed and included in the Tab key sequence for contribution posting for all newly created batches.
![]() This option sets the default display of the Check Number field
for new batches. If desired, you can override the global setting when creating a new batch. For example, you can enable the display of the field here but select not to display the field when creating a specific batch.
This option sets the default display of the Check Number field
for new batches. If desired, you can override the global setting when creating a new batch. For example, you can enable the display of the field here but select not to display the field when creating a specific batch.
This option has two settings:
-
Selected: the Check Number field is displayed in the batch form for newly created batches and included in the Tab key sequence for payment and contribution posting.
-
Not selected: the Check Number field is not displayed in the batch form for newly created batches.
Batch Posting - Enable Memo field by defaultBatch Posting - Enable Memo field by default
A global control that determines whether the Memo field is displayed by default and included in the Tab key sequence for contribution posting for all newly created batches.
![]() This option sets the default display of the Memo field for all new batches. If desired, a user can override the
global setting when creating a new batch. For example, you can enable the display of the field here but a user can choose not to display the field when creating a specific batch.
This option sets the default display of the Memo field for all new batches. If desired, a user can override the
global setting when creating a new batch. For example, you can enable the display of the field here but a user can choose not to display the field when creating a specific batch.
This option has two settings:
- Selected: the Memo field is displayed in the batch form for new batches and included in the Tab key sequence for payment and contribution posting.
-
Not selected: the Memo field is not displayed in the batch form for newly created batches.
Batch Posting - Use Quick Posting by DefaultBatch Posting - Use Quick Posting by Default
A global control that lets you configure Quick Posting as the default method for posting contributions to newly created batches.
Depending on the volume of contribution records that must be entered, getting data into your system can be
a time-consuming process. Data entry errors are bound to happen. With the traditional posting method, data
is validated as it is entered
into each field in a contribution record, and the user must correct any errors
before saving the contribution. While the traditional method is effective at reducing data entry errors, it comes with consequences: errored entries can significantly
interrupt and slow down a user’s workflow and productivity. On the other hand, with the Quick Posting method, the system checks the values in a contribution record after all the data in a record is entered. Any errors that are found do not need
to be corrected before the contribution is saved. The user’s workflow is not interrupted, allowing them to complete data entry and go back later to correct any errors the system flags. With the Quick Posting method, a user especially proficient
at data entry can enter contribution data as quickly as their skills allow.
![]() This option sets the default method for posting contributions in newly created batches. If desired, a user can override the global setting when
creating a new batch. For example, you can specify the default setting her, but a user can override the default when creating a specific batch.
This option sets the default method for posting contributions in newly created batches. If desired, a user can override the global setting when
creating a new batch. For example, you can specify the default setting her, but a user can override the default when creating a specific batch.
The checkbox has two settings:
- Selected: sets the Quick Posting method as the default for posting contributions to newly created batches. In the batch form for newly created batches, the Batch Uses Quick Posting option is pre-selected.
- Not selected: sets the traditional posting method as the default for posting contributions. In the batch form for newly created batches, the Batch Uses Quick Posting option is not selected.

In this dropdown list, select the default search field for batch data entry. When the user posts a contribution to a batch, the system uses the default search field to match the posting on.
- Diocesan ID: sets the Diocesan ID, a unique ID used to identify each family, as the default lookup value. Note that some organizations are set up to use the Diocesan ID instead of the Family DUID to identify families. This setup is done in the ParishSOFT Family Suite Administration module.
- Family Name: sets the family's last name as the default lookup value.
- Envelope Number: sets the envelope number, a unique number used to identify each family or member, as the default lookup value.
- Envelope Number & Family Name: sets the Env# and Family Name as the default lookup fields in the data entry form for batches. As illustrated below, the envelope number and name data are split into two fields:

- Envelope Number & Member Name: sets the Env# and Member Name as the default lookup fields in the data entry form for batches. The envelope number and name data are split into two fields.
 Help Button
Click  to access the Offering Help. The Help opens in a separate browser so that you can view it while working in the module. The Help provides an
overview of Offering concepts and features and offers step-by-step instructions on how to perform specific Offering tasks.
to access the Offering Help. The Help opens in a separate browser so that you can view it while working in the module. The Help provides an
overview of Offering concepts and features and offers step-by-step instructions on how to perform specific Offering tasks.
 Initials Button
This button shows the initials of the logged-in user. Clicking the button display the Log Out option. Click this option to log out of Offering.

 Save Button
Click ![]() to save changes to settings.
to save changes to settings.
Related Topics
How to Set Up System Preferences and Defaults
About the Integration Import Page