Using Offering for the First Time to Process Gifts
The Offering application enables you to record regular and charitable contributions (offerings) as well as income received for pledges, tithes, and capital campaigns. If you are using Offering for the first time, this topic guides you through the sequence of tasks and steps required to enter family and member contributions and pledges into your system.
Permissions
To use the processes defined in this topic, you must have Offering > Add/Edit permissions tied to your login credentials. Additionally, you must be given specific permission to access the funds to which you are posting contributions and pledges. For details on granting fund permissions, go to How to Manage Access Permissions by Fund or How to Manage a Staff Member's Fund Access Permissions.
Getting Started
What types of gifts do you need to enter into Offering? Contributions only? Pledges only? Or pledges accompanied by an initial payment? To help you get started, this topic provides three workflows. Each workflow documents the series of steps to take to set up Offering for the first time. Then, it shows the actions to follow to enter a specific gift type (for example, pledges) into your system. To view the details and tasks for a specific workflow, click the desired link below:
Setting Up Offering and Entering Contributions
Setting Up Offering and Entering Pledges Only
Setting Up Offering and Entering Pledges Accompanied by an Initial Payment
Setting Up Offering and Entering Contributions
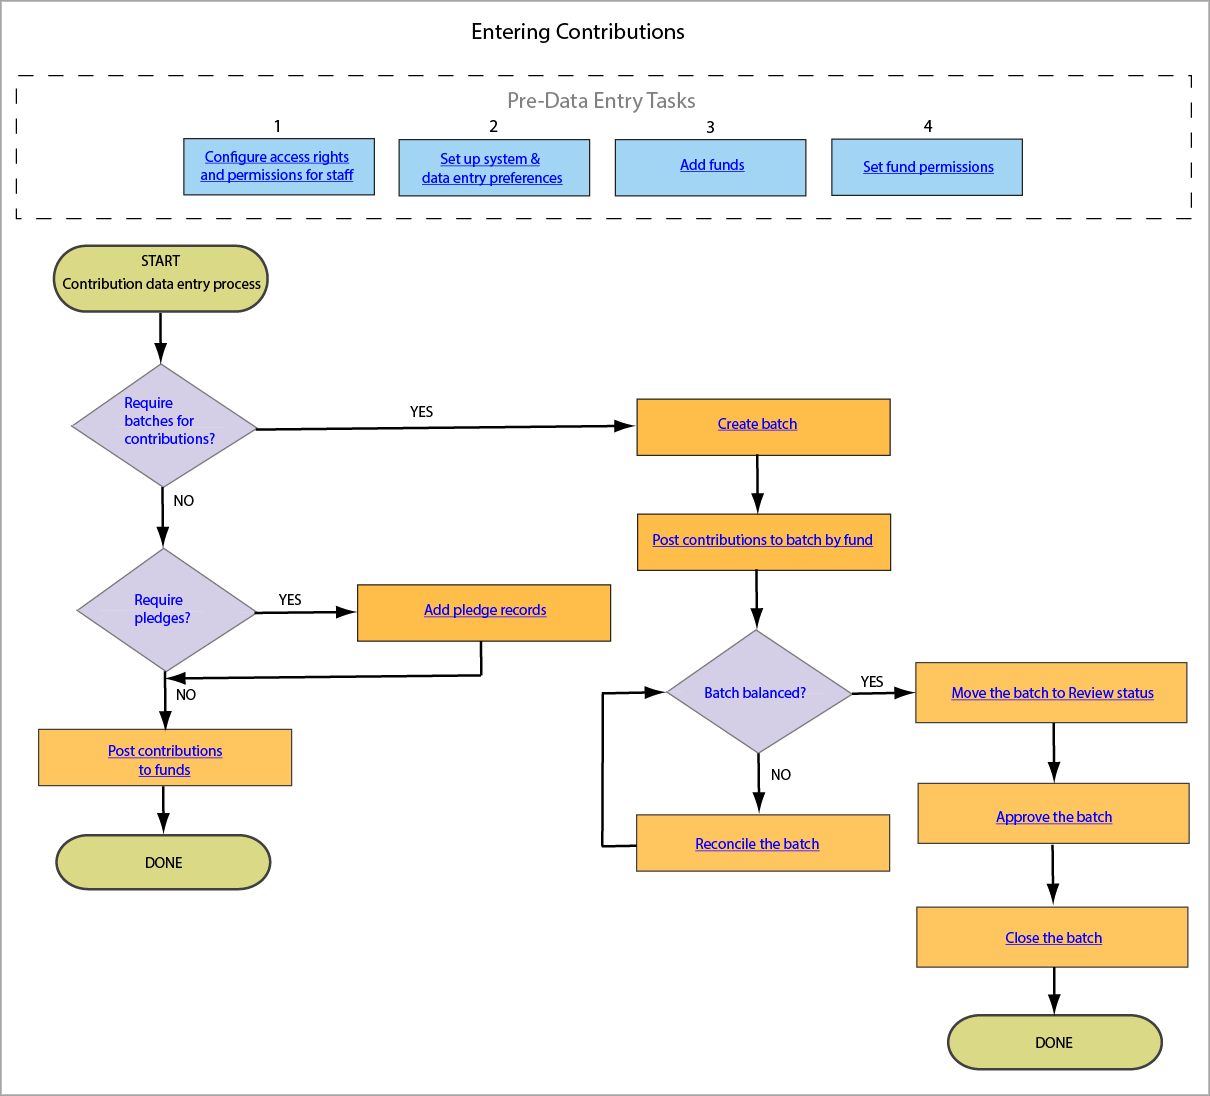
The information below guides you through the initial set up of Offering and provides the steps to follow to enter contributions into the system.
Pre-Data Entry Tasks
To get started, complete the pre-data entry tasks. Each rectangle contains a defined task or action. The task contains a link that, when clicked, takes you to a topic showing you how to complete it. After completing a task, return to the diagram and proceed to the next task. Continue in this manner until you complete the five tasks.
Contribution Data Entry
The flowchart defines the steps to follow to enter contributions into Offering. Begin at the START point. Follow the directional arrows ( ![]()
![]() ) to the shapes. The decision shapes
) to the shapes. The decision shapes ![]() contain a question. Your answer to the question (Yes or No) determines which arrow to follow. The rectangles
contain a question. Your answer to the question (Yes or No) determines which arrow to follow. The rectangles
![]() contain the task or action you should take.
contain the task or action you should take.
The task inside of the rectangle is a clickable link to another topic in the Help. Click the task to go directly to a topic that contains step-by-step instructions for completing the task. When you are done with a task, return to the flowchart and
follow the arrow to the next question or task. Continue in this manner until you reach ![]() DONE.
DONE.

Setting Up Offering and Entering Pledges Only
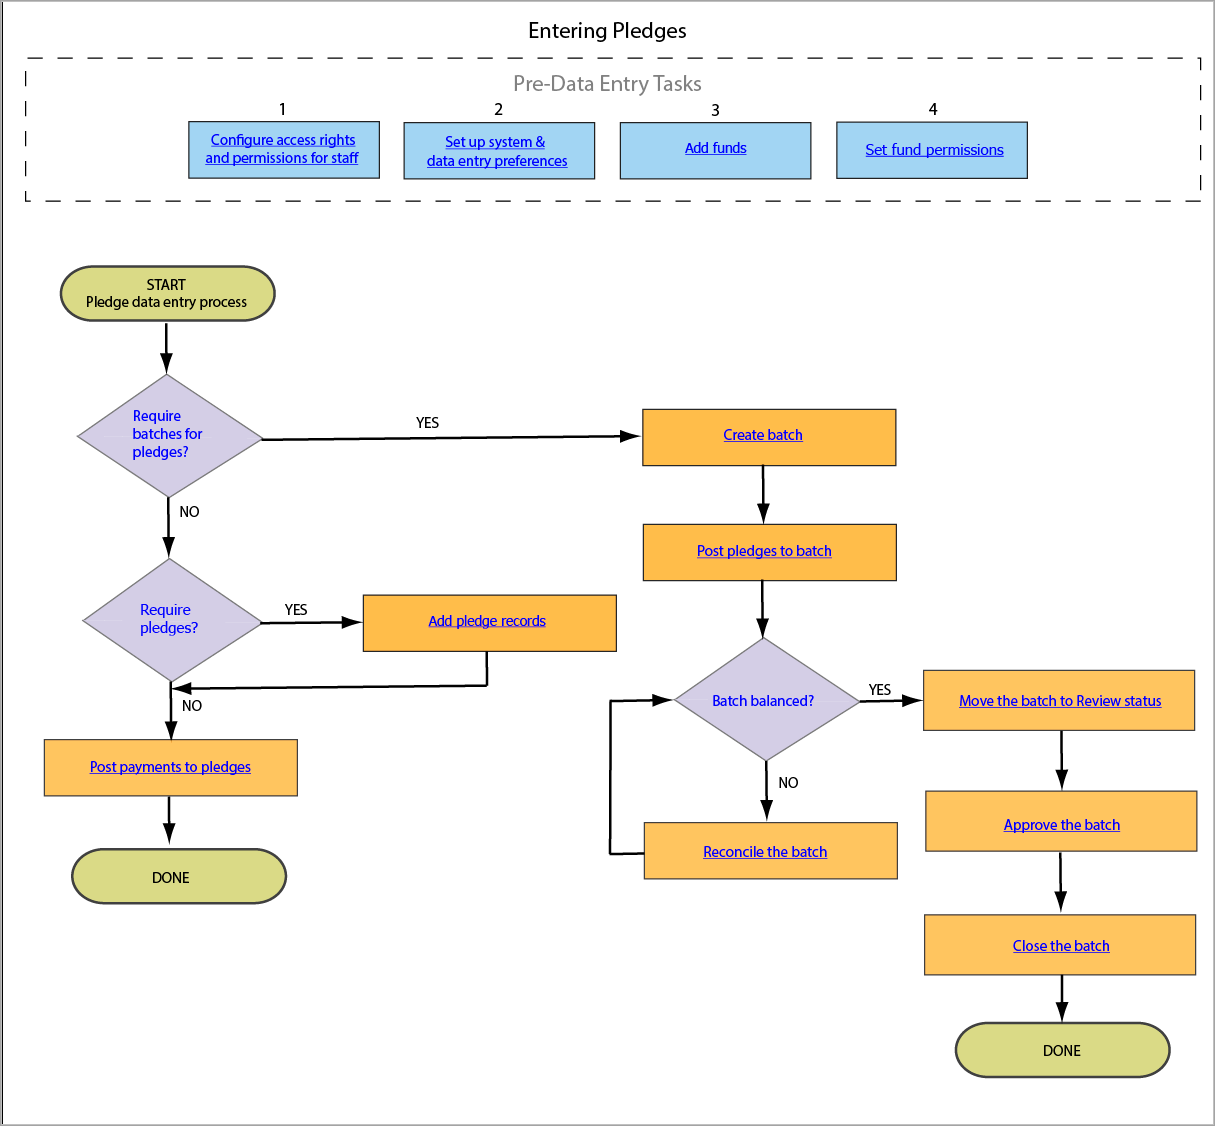
The information below guides you through the initial set up of Offering and provides the steps to follow to enter pledges into the system.
Pre-Data Entry Tasks
To get started, complete the pre-data entry tasks. Each rectangle contains a defined task or action. The task contains a link that, when clicked, takes you to a topic showing you how to complete it. After completing a task, return to the diagram and proceed to the next task. Continue in this manner until you complete the five tasks.
Pledge Data Entry
The flowchart defines the steps to follow to enter pledges into Offering.
Begin at the START point. Follow the directional arrows ( ![]()
![]() ) to the shapes. The decision
shapes
) to the shapes. The decision
shapes ![]() contain a question. Your answer to the question (Yes or No) determines which arrow to follow. The rectangles
contain a question. Your answer to the question (Yes or No) determines which arrow to follow. The rectangles ![]() contain the task or action you should take.
contain the task or action you should take.
The task inside of the rectangle is a clickable link to another topic in the Help. Click the task to go directly to a topic that contains step-by-step instructions for completing the task. When you are done with a task, return to the flowchart and
follow the arrow to the next question or task. Continue in this manner until you reach ![]() DONE.
DONE.

Setting Up Offering and Entering Pledges Accompanied by an Initial Contribution
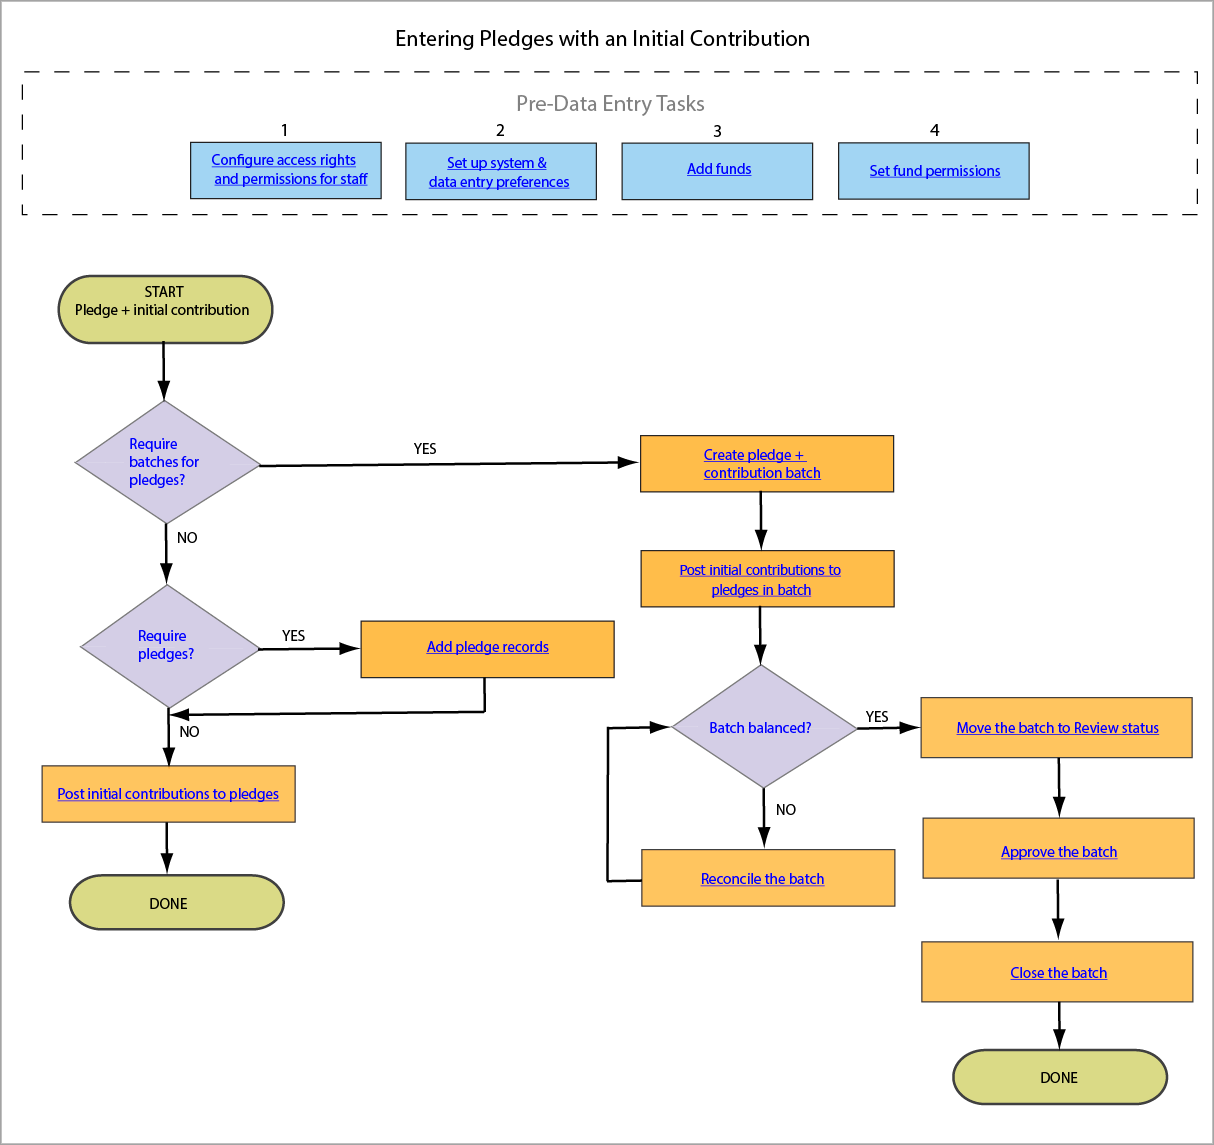
The information below guides you through the initial set up of Offering and provides the steps to follow to enter pledges accompanied by an initial contribution (sometimes referred to as a down payment) into the system.
Pre-Data Entry Tasks
To get started, complete the pre-data entry tasks. Each rectangle contains a defined task or action. The task contains a link that, when clicked, takes you to a topic showing you how to complete it. After completing a task, return to the diagram and proceed to the next task. Continue in this manner until you complete the five tasks.
Pledge + Initial Contribution Data Entry
The flowchart defines the steps to follow to enter pledges accompanied by an initial contribution into Offering. Begin at the START point. Follow the directional arrows ( ![]()
![]() ) to the shapes. The decision shapes
) to the shapes. The decision shapes ![]() contain a question. Your answer to the question (Yes or No)
determines which arrow to follow. The rectangles
contain a question. Your answer to the question (Yes or No)
determines which arrow to follow. The rectangles ![]() contain the task or action you should take.
contain the task or action you should take.
The task inside of the rectangle is a clickable link to another topic in the Help. Click the task to go directly to a topic that contains step-by-step instructions for completing the task. When you are done with a task, return to the flowchart and
follow the arrow to the next question or task. Continue in this manner until you reach ![]() DONE.
DONE.
