How to Post Contributions to a Batch
Two methods are available for posting contributions to a batch:
With this method, the system validates data as you enter it into each field in a contribution record and forces you to correct errors before letting you save a contribution. While this method is effective at reducing data entry errors, it comes with consequences: the fact that you must stop and correct errors before saving a record can significantly interrupt and slow down your workflow and productivity.
With Quick Posting, the system checks the values in a contribution record after all the data in a record is entered. The system does not force you to correct errors before saving a contribution record. Your workflow is not interrupted, allowing you to complete the data entry process and then go back later to correct any errors the system flags. With the Quick Posting method, if you are especially proficient at data entry, you can enter contribution data as quickly as your typing skills allow.
Instructions for both posting method are provided below. You can use either method. Choose the one that best fits your particular circumstances, skills, or preferences.
Traditional Posting Method
![]() Keyboard shortcuts are available to save you time when posting contributions. For details, go to Data Entry Tips to Speed Your Workflow.
Keyboard shortcuts are available to save you time when posting contributions. For details, go to Data Entry Tips to Speed Your Workflow.
For each contribution you want to post to the batch, complete the following:
- Open the Batches page.
- In the batch list, locate the batch you want to post contributions to in the batch list. To quickly find the desired batch, use the Search or Filter function.
![]() Position your mouse over the Info icon
Position your mouse over the Info icon ![]() to find out what type of data the Search bar accepts.
to find out what type of data the Search bar accepts.
- Click
 to open the Postings page.
The page opens to the Contributions tab. The right panel lists default settings you can apply to the posting form to save time and make the posting process more efficient. That is, instead of changing the selection settings every time you post a new contribution, you can set default values in the panel initially so that from then on, you always have the desired settings in the form. If you want to change a specific default setting on the fly, simply change it in the form where necessary.
- If desired, set your defaults for posting contributions.
- Find the donor whose pledge you want to post. To do this, complete the following:
- In the posting form, click
 .
. - Enter your search criteria into the Directory Search fields. Then, click
 to find the donor in your database.
 - Select the donor's last name link.
You return to the Postings page where the donor's information is displayed.
- In the posting form, click
- To post a contribution, complete the following:
- The Amount field is auto-filled with the amount entered in the previous contribution record. If necessary, remove the auto-filled amount and enter a different amount into the field.
- As desired, complete the remaining fields in the contribution record.
- If you need to change details for the contribution, click this button:
 . Make the necessary changes. Then, click
  .
.
- Click
 to post the contribution to the batch.
The system increments the Count field and updates the Amount field in the batch header. The system records the contribution and adds it to the list on the Contributions page.
Quick Posting Method
The next sections show you how to set up Quick Posting as the default method for posting contributions and how to use quick posting to create a new batch.
Setting Up Quick Posting As the Default Posting Method
If you want to make Quick Posting available to users in your organization, you first must activate a setting at the global level to enable the feature. The following procedure shows you how to do this.
![]() Important
Important
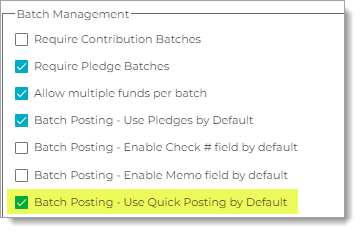
The Quick Posting feature is disabled by default. To enable this feature, you must have Organization Admin permission.
- In the navigation bar, select Settings to open the Settings page.
- In the Batch Management group on the Administration tab, select the Batch Posting - Use Quick Posting by Default option, as shown below:
- In the upper-right corner, click
 to save the setting.
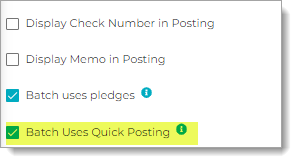
All newly created batches are now configured by default to use the Quick Posting method. As shown in the following illustration, the Batch Uses Quick Posting option in the batch form is pre-selected whenever a parish user creates a new batch:
Note that even though the option is pre-selected, a user can choose whether or not to use Quick Posting. To use it, they must keep the Batch Uses Quick Posting option selected. If they want to use the traditional posting method, they must deselect the option.
![]() Important
Important
After the batch is saved, the setting selected for the Batch Uses Quick Posting option cannot be changed.
Creating a Quick Posting Batch
To create a Quick Posting batch:
- Open the Batches page.
- In the toolbar, click
.png) (Add New Batch).
(Add New Batch). - Enter details for the batch. Make sure that the Batch Uses Quick Posting checkbox selected as shown below:
- Click to save the batch.
The batch is saved to the Batches page with a status of Open. You can now open the batch and add contributions to it.
Using Quick Posting to Post Contributions to a Batch
The process for posting contributions to a batch that uses Quick Posting is the same as that used for a batch that uses the traditional posting method. For instructions, go to Traditional Posting Method.
Related Topics
Data Entry Tips to Speed Your Workflow