About the Registration Page
This topic provides quick reference for the elements on the Registration page, which includes but is not limited information about its links, buttons, input controls, and navigational components. As a quick reference, the topic provides short but useful summaries and descriptions of each element on the page to help you quickly understand its particular function and the tasks you can use it to perform.
This topic provides no instructional information, providing instead links you can follow, if necessary, to obtain detailed step-by step instructions for tasks associated with elements on the page.
In this topic
Overview of the Registration Page
Showing # - # of # Total Records
Overview of the Registration Page
The Registration page shows registration records that were manually added by staff as well as those entering the system through the online registration process. The records on this page are pending registrations that must be reviewed and approved by staff. When registrants submit their registrations, their records display on this page, enabling you to view their requests and assign them to the right class.
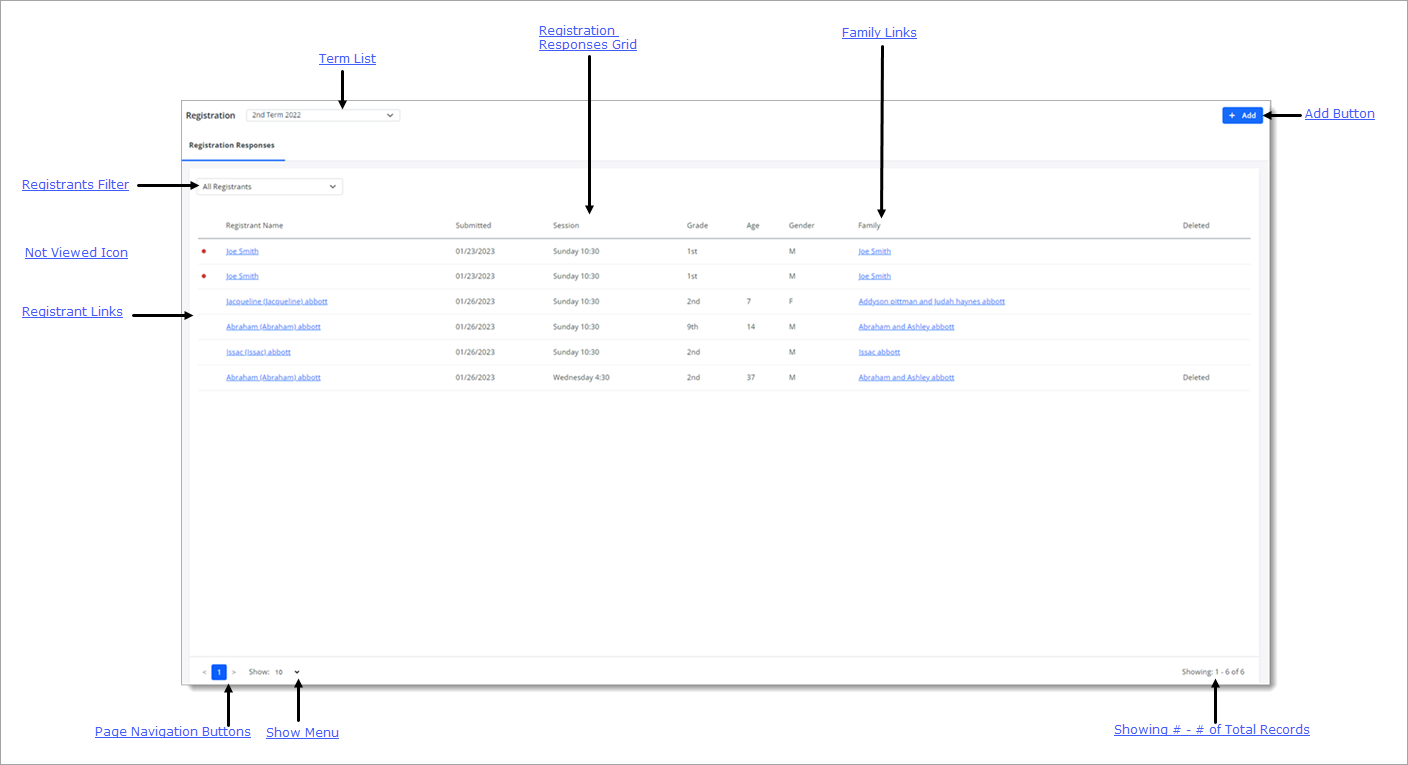
The illustration below identifies the main elements on the Registration page. Click the link in the illustration to jump to the section on this page that describes the element.

Term List
At the top of the page, the Term list contains a list of the selected organization's active terms. Select the desired term to view its registration records.
Registrants Filter
The Registrants filter enables you to filter the registration records to view records for specific groups of registrants (for example, online registrants only). The filter settings are listed and described below. Click a setting to open it and view its description.
All RegistrantsAll Registrants
(default) Shows the names of all individuals whose registrations for the selected term were submitted online and manually added by staff.
All Online RegistrantsAll Online Registrants
Shows the names of all individuals who self-registered for a class through the online registration process in My Own Church (MOC).
All Manual RegistrantsAll Manual Registrants
Shows the names of all individuals whose registrations for classes in the selected term were submitted by staff.
Assigned and UnassignedAssigned and Unassigned
Shows the names of individuals in the selected term who are assigned to a class and registrants are not assigned to a class.
Assigned Class OnlyAssigned Class Only
Shows the names of individuals who are assigned to a class in the selected term.
Unassigned Class OnlyUnassigned Class Only
Shows the names of individuals who are not yet assigned to a class in the selected term.
Shows the names of individuals whose registration request was not approved.
Registration Responses Grid
The grid shows online registration records matching your filter criteria. Columns in the grid provide the following information.
- Registrant Name: first and last name of the student who submitted a registration request. Click the link to open the registration record.
- Submitted: date the registration request was submitted.
- Session: on the registration form, the student can indicate their first, second, and third preferences for the session in which the class they are registering is held. This column shows the student's first preference.
- Grade: registrant's grade as indicated on the registration form.
- Age: registrant's age as indicated on the registration form.
- Gender: registrant's gender as indicated on the registration form.
- Family: registrant's family name. Click the link to open the family's record in Family Directory.
- Denied: indicates that a staff member reviewed and denied the student's registration request.
Not Viewed IconNot Viewed Icon
A red dot ![]() to the left of a registrant's name indicates that their registration request has not been viewed.
to the left of a registrant's name indicates that their registration request has not been viewed.

Click the individual's name link to open the registration record to view the request.
Registrant Name LinkRegistrant Name Link
Click the link to view the registration record.
Family Name LinkFamily Name Link
Click the link to open the registrant's family record in Family Directory.
 Add Button
The Add button lets you register students and assign them to a term and a session (if the term uses sessions) but not to a class. Use this feature when you want to register students in your program but are not ready to make class assignments. In this way, you can delay assigning them to a class until you have a better idea of enrollment numbers.
After you add students, their names are listed in the grid on the Registrations page. Their registrations are now in pending status until staff reviews and approves (or denies them) and assigns them to a class.
For instructions on registering a student now and assigning them to a class later, go to How to Register a Student Without Enrolling in a Class.
Page Navigation Buttons
The page buttons at the bottom of the page let you quickly navigate through records in the grid.

 : click the page number to go directly to the numbered page. For example, clicking 3 takes you to page 3 in the grid.
 : click to go one page back from the page you are currently viewing in the grid.
 : click to go one page forward from the page you are currently viewing in the grid.
 : click to go to the first page in the grid.
 : click to go to the last page in the grid.
Show Menu
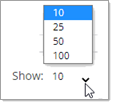
The Show menu lets you choose the maximum number of records to display per page. The default is set to 10. To change the number or records, click  to open the menu. Then, select a value of 25, 50, or 100, as shown below :
![]() To speed up page loading, select a lower value.
To speed up page loading, select a lower value.

Showing # - # of # Total Records
The bottom right corner of the page shows which records in the grid you are currently viewing out of the total number of records across all pages of the grid. Note that the total record count in the view (Showing # - # range) varies depending on the maximum number of records selected for pagination in the Show Menu.
In the illustration below, the Show menu is set to display 10 records per page, so that is the number the system fetches to display in the grid out of a grand total of 27 records in the grid.

Related Topics
How to Register and Assign a Student to a Class Later
How to Review and Process Online and Manually Submitted Registrations