About the Students & Volunteers Page
This topic provides quick reference for the elements on the Students & Volunteers page, which includes but is not limited information about its links, buttons, input controls, and navigational components. As a quick reference, the topic provides short but useful summaries and descriptions of each element on the page to help you quickly understand its particular function and the tasks you can use it to perform.
This topic provides no instructional information, providing instead links you can follow, if necessary, to obtain detailed step-by step instructions for tasks associated with elements on the page.
In this topic
Overview of the Students & Volunteers Page
Showing # - # of # Total Records
Overview of the Students & Volunteers Page
The Students & Volunteers page lists the names of students and volunteers in your religious education program for the selected term. The page is divided into two main sections:
- Students tab: lists the names of students registered for and enrolled in classes in the selected term.
- Volunteers tab: lists the names of volunteer staff in the selected term. The tab is further divided into separate grid views: one to show you the names of volunteers currently assigned to classes and another to show you the names of volunteers not yet assigned to classes.
Students Tab
The Students tab lists names of students who are assigned to a class in the selected term.
![]() Students not yet assigned to classes (pending registrations) are listed on the Registrations Page.
Students not yet assigned to classes (pending registrations) are listed on the Registrations Page.
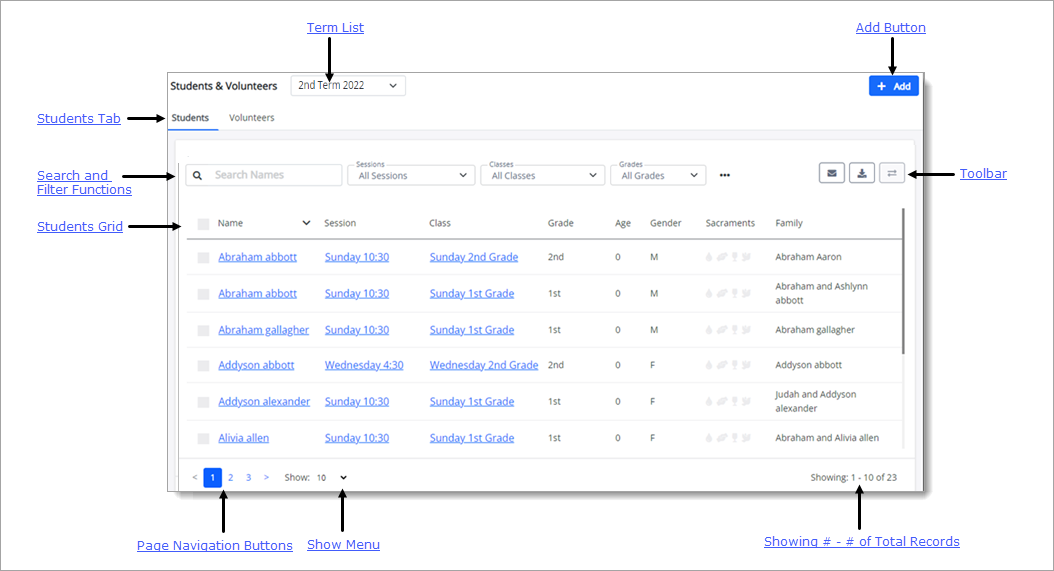
The illustration below identifies the main elements on the Students tab. Click a link on the illustration to jump to an item's description in this topic.

This dropdown list contains all of the terms created for your organization's Religious Education program. The default term is the one you selected when configuring the application on the Settings page.
To change the term, simply select the one you want to work with in the dropdown list. The term you select becomes the default term for this page and for all other pages that have a Terms list (for example, the Classes page ).
Click to register and enroll a student into a class in the selected term. After you submit the registration, the student's name is added to the grid on the Students tab.
For instructions on adding a student to a class, go to Registering and Enrolling Students on the Students & Volunteers Page.
Search and Filter FunctionsSearch and Filter Functions
Use the Search function to find a specific student's record in the grid. Simply type letters appearing in the student's name in the ![]() Search Names field, and then click
Search Names field, and then click  to find the student you are looking for.
The Filter functionality consists of several filters that you can apply singly or in combination to narrow down the list of students. The filters are useful for creating specific views of your student data. For example, if you want to view students in a specific grade, select the desired grade in the Grades dropdown list.
Descriptions of the filters are provided below:
- Sessions: this dropdown lists the sessions your organization has created for the selected term. By default, the filter is set to All Sessions. If desired, you can filter your student data on one or more sessions by selecting the desired checkboxes.
- Classes: this dropdown lists the classes your organization has created for the selected term. By default, the filter is set to All Classes. You can filter your student data on one or more classes by selecting the desired checkboxes.
- Grades: this dropdown lists the grades your organization has created for the selected term. By default, the filter is set to All Grades. You can filter your student data on one or more grades by selecting the desired checkboxes.
- Departments: click
 to display this filter. This dropdown lists the departments your organization has created for the selected term. By default, the filter is set to
All Departments. You can filter your student data on one or more departments by selecting the desired checkboxes. Click
  to add the filter to your search criteria.
 - Sacraments: click
 to display this filter. This dropdown lists four sacrament options: Baptism, Reconciliation
Prep, 1st Eucharist, and Confirmation. By default, the filter is set to All Sacraments. You can filter your student data on one or more sacraments
by selecting the desired checkboxes. Click
  to add the filter to your search criteria.
After you select your filters, click  to launch the search. The grid updates with results matching your filter criteria. To clear your filters, select Reset.
Toolbar ButtonsToolbar Buttons
 Email
Email
Click to open the email client to send an email to selected individuals in the grid on the Students or Volunteers tab. For instructions on creating an email, go to How to Create an Email Message.
 Download
Click to download a list of individuals selected in the grid on the Students or Volunteers tab to an Excel file. For instructions on downloading, go to
 Email
Email
Click to open the email client where you can create an email to send to students selected in the grid. For instructions on creating an email, go to How to Send an Email to Students.
 Export
Click to export a filtered list of records selected in Students grid to a .csv file. For instructions on exporting records, go to How to Export a List of Students to a CSV File.
 Promote/Transfer
Click to promote or transfer students selected in the Students grid from one class to another. For instructions on promoting/transferring a student, go to How to Promote or Transfer Students to a New Class.
The Students grid displays the names of students matching your search and filter criteria. The grid includes the following columns of information about each student:
- First and last name
- Session name
- Class name
- Grade
- Age
- Gender
- Completed sacraments
- Family name
Many of the elements in the columns are active links you can click to view detailed information. For example, clicking a link in the Class column opens the selected class record. There you can view details about the class, including its enrollment capacity and room location. You can also see the names of students enrolled in the class. Additional features let you enroll new students or transfer existing students to a different class.
Volunteers Tab
The Volunteers tab lists the volunteers in the selected term. The tab organizes volunteers into two groups: those assigned to a class and those who are not assigned to a class.
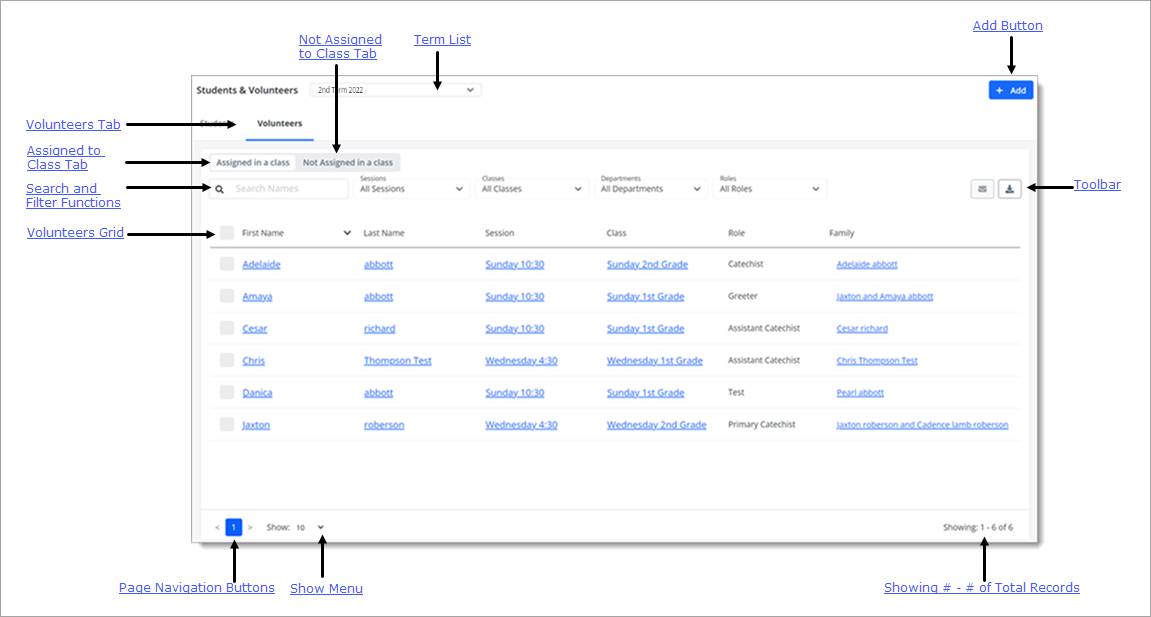
The illustration below identifies the main elements on the Volunteers tab. Click a link on the illustration to jump to an item's description in this topic.

This dropdown list contains all of the terms created for your organization's Religious Education program. The default term is the one you selected when configuring the application on the Settings page.
To change the term, simply select the one you want to work with in the dropdown list. The term you select becomes the default term for this page and for all other pages that have a Terms list (for example, the Classes page ).
Click to add a volunteer to the selected term. Depending on whether or not you assign the volunteer to a class, their name is added to Assigned to class list or the Not Assigned to class list on the Volunteers tab.
For instructions on adding a volunteer, go to How to Add a Volunteer to Your Program.
Assigned to class TabAssigned to class Tab
Select this tab to view the names of volunteers in the selected term who are assigned to a class.
Not Assigned to class TabNot Assigned to class Tab
Select this tab to view the names of volunteers in the selected term who are not currently assigned to a class.
Search and Filter FunctionsSearch and Filter Functions
Use the Search function to find a specific volunteers record in the grid. Simply type letters appearing in the volunteer's name in the ![]() Search Names field, and then click
Search Names field, and then click  to find the volunteer you are looking for.
The Filter function consists of several filters that you can apply singly or in combination to narrow down the list of volunteers. The filters are useful for creating specific views of your volunteer data. The set of filters available varies depending on whether you are viewing the Assigned to class or Not Assigned to class tab.
The filters are described below:
Assigned to class Filters
- Sessions: this dropdown lists the sessions your organization has created for the selected term. By default, the filter is set to All Sessions. If desired, you can filter your volunteer data on one or more sessions by selecting the desired checkboxes.
- Classes: this dropdown lists the classes your organization has created for the selected term. By default, the filter is set to All Classes. You can filter your volunteer data on one or more classes by selecting the desired checkboxes.
- Departments: this dropdown lists the departments your organization has created for the selected term. By default, the filter is set to All Departments. You can filter your volunteer data on one or more departments by selecting the desired checkboxes.
- Roles: this dropdown lists the roles your organization has created for the selected term. By default, the filter is set to All Roles. You can filter your volunteer data on one or more roles by selecting the desired checkboxes.
After you select your filters, click  to begin the search. To clear your filters, select Reset.
Not Assigned to class Filters
- Sessions: this dropdown lists the sessions your organization has created for the selected term. By default, the filter is set to All Sessions. If desired, you can filter your volunteer data on one or more sessions by selecting the desired checkboxes.
- Roles: this dropdown lists the roles your organization has created for the selected term. By default, the filter is set to All Roles. You can filter your volunteer data on one or more roles by selecting the desired checkboxes.
After you select your filters, click  to begin the search. To clear your filters, select Reset.
 Email
Email
Click to open the email client where you can create an email to send to volunteers selected in the grid in the Assigned to class or Not Assigned to class tab.
For instructions on creating an email, go to How to Send an Email to Volunteers.
 Export
Click to export a filtered list of volunteers selected in the grid in the Assigned to class or Not Assigned to class tab to a .csv file.
For instructions on exporting a list, go to How to Export a List of Volunteers to a CSV File.
Volunteers GridVolunteers Grid
The Volunteers grid displays the names of volunteers matching your search and filter criteria. The tabs above the grid let you change the grid view to see the names of volunteers assigned to a class or the names of those not assigned to a class. Both grids include the following columns of information about each volunteer:
- First and last name
- Session name
- Class name
- Role
- Family name
Many of the elements in the columns are active links you can click to view detailed information. For example, clicking a link in the Class column opens the selected class record. There you can view details about the class, including its enrollment capacity and room location. You can also see the names of volunteers assigned to the class and the names of enrolled students. Additional features let you add or remove volunteers, enroll new students, or transfer existing students to a different class.
Page Navigation Buttons
The page buttons let you quickly navigate through a multi-page grid.

 : click the page number to go directly to the numbered page. For example, clicking 3 takes you to page 3 in the grid.
 : click to go one page back from the page you are currently viewing in the grid.
 : click to go one page forward from the page you are currently viewing in the grid.
 : click to go to the first page in the grid.
 : click to go to the last page in the grid.
Show Menu
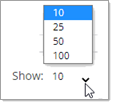
The Show menu lets you choose the maximum number of records to display per page in the grid. The default is set to 10. To change the number or records, click  to open the menu. Then, select a value of 25, 50, or 100, as shown below:
![]() To speed up page loading, select a lower value.
To speed up page loading, select a lower value.

Showing # - # of # Total Records
The bottom right corner of the page shows which records in the grid you are currently viewing out of the total number of records across all pages of the grid. Note that the total record count in the view (Showing # - # range) varies depending on the maximum number of records selected for pagination in the Show Menu.
In the illustration below, the Show menu is set to display 10 records per page, so that is the number the system fetches to display in the grid out of a grand total of 27 records in the grid.

Related Topics
How to Add and Immediately Enroll a Student in a Class
How to Send an Email to Students
How to Export a List of Students to a CSV File
How to Promote or Transfer Students to a New Class
How to Add a Volunteer to Your Program
How to Send an Email to Volunteers
How to Export a List of Volunteers to a CSV File
