 About the Funds Page
The Funds page provides access to your organization's funds. On this page, you can add new fund records and manage existing ones. You can also apply criteria that enables you to find records that have specific characteristics in common, such as tax-deductible funds and funds with a specific start date.
To access the Funds page, you must either have Organization Admin access rights tied to your login credentials. If you do not have Organization Admin access, the Funds option is not visible in the Offering menu in the navigation bar.
Access rights and permissions are granted to individual users in their staff records, accessed through the Manage Staff page in the Administration module. You must have Organization Admin rights to view the page and assign permissions. For details, see the online Help for the ParishSOFT Administration module.
What Is a Fund?What Is a Fund?
In Offering, a fund is a repository for monies collected or to be collected for a specific financial purpose. In your organization's Chart of Accounts, a fund identifies the account to which your organization records and tracks financial gifts and pledges. An organization can have any number of funds, each for a specific financial purpose. For example, funds can be created to support church building and repair projects, scholarships, relief services, and the training of seminarians and lay ministers, to name a few.
What Is a Fund Record?What Is a Fund Record?
A fund record contains detailed information about a fund, including its name or description, name of the organization owning the fund, account number, and dates, to name a few. For more information about a fund record, go to Fund Record.
Overview of the Funds Page
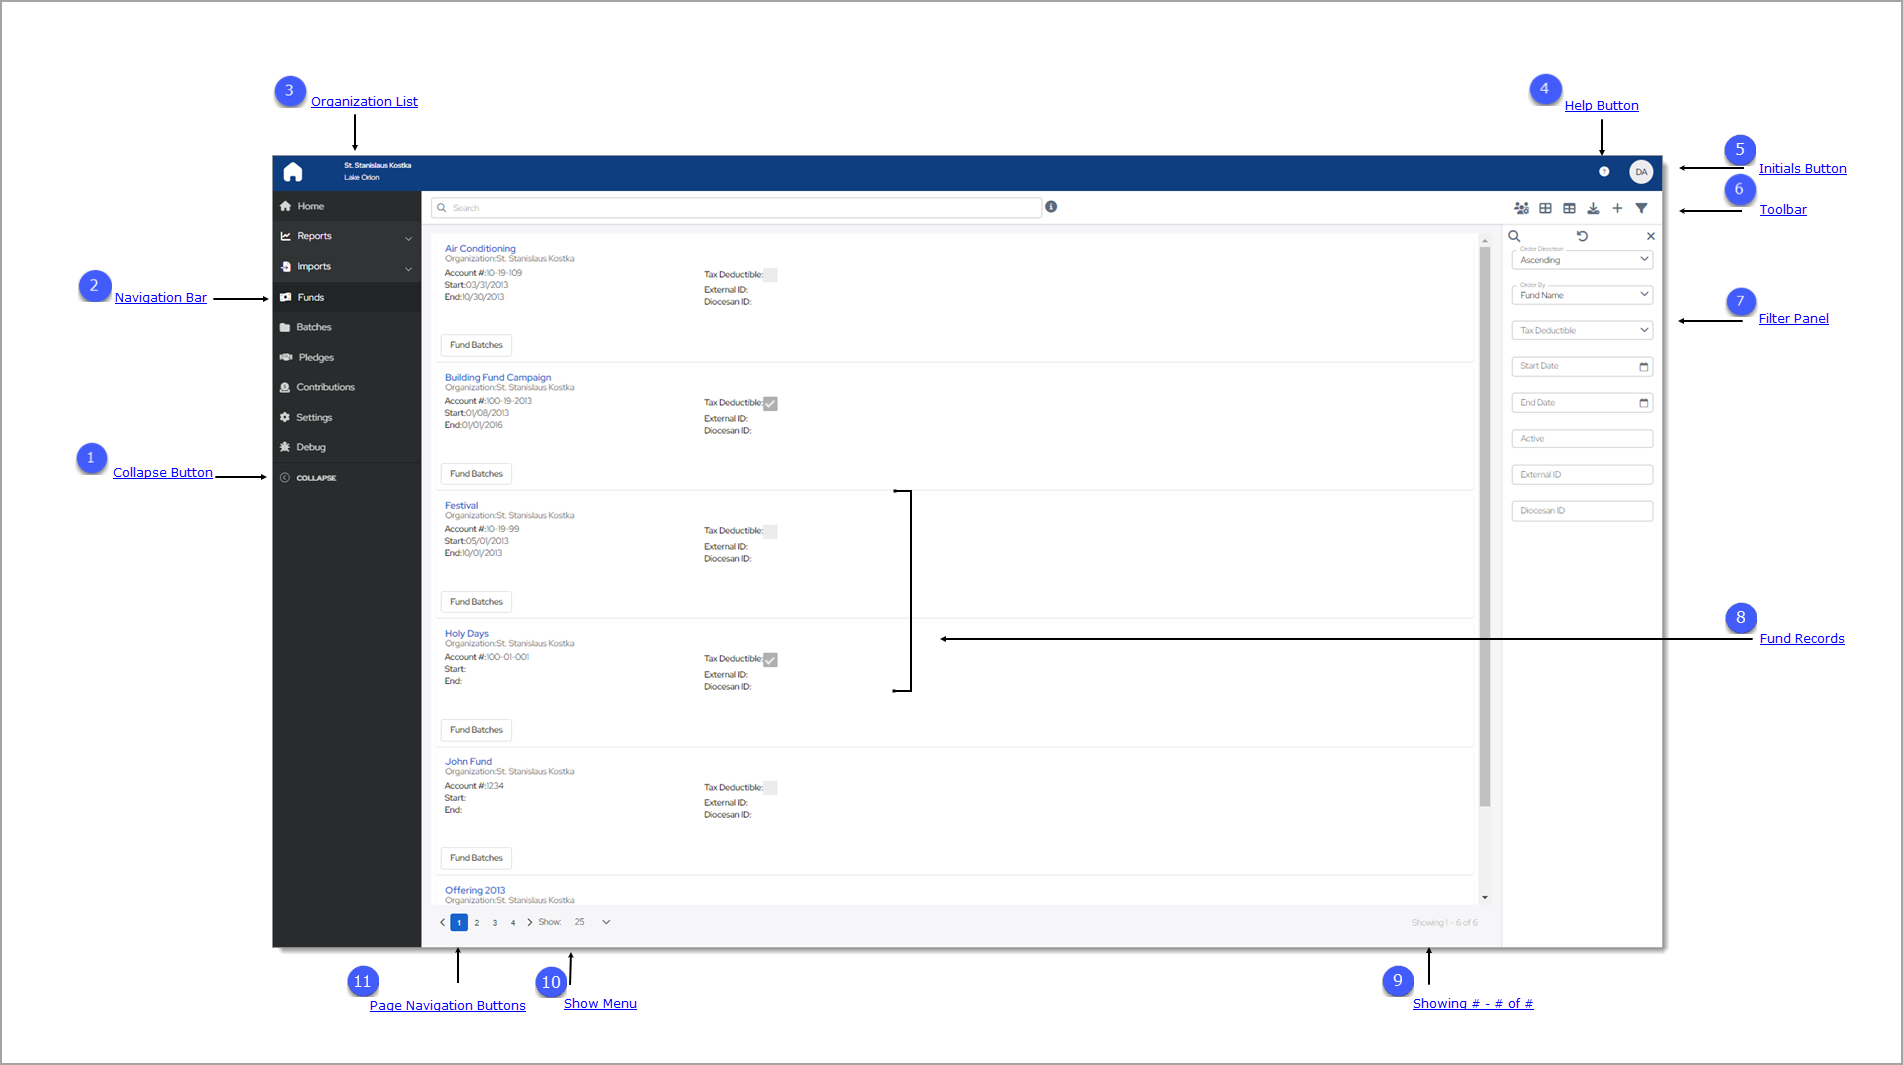
The image below identifies the main elements on the Funds page. Click a numbered link to view a detailed description of the element.
![]() When you first open the Funds page, no records are displayed. To find a specific fund record, use the Search or Filter feature.
When you first open the Funds page, no records are displayed. To find a specific fund record, use the Search or Filter feature.
 Collapse Button
By default, the Navigation Bar is expanded, so the entire name of each page is visible. If you need more viewing space in the right panel, you can collapse the menu by clicking  . Doing so minimizes the
menu so that only the page icons are visible:
. Doing so minimizes the
menu so that only the page icons are visible:

To return the Navigation Bar back to the expanded position, click  (Expand). Note that the state (expanded or minimized) of the menu that you specify on any page stays the same
on all pages until you change it.
(Expand). Note that the state (expanded or minimized) of the menu that you specify on any page stays the same
on all pages until you change it.
 Navigation Bar
The Navigation Bar is the menu that sits on left side of the Funds page (and on every other page in the module). The menu lists the module's primary pages and provides a way for you to quickly move from one page to another. When you want to view a specific page's content, simply select the page option.
 Organization List
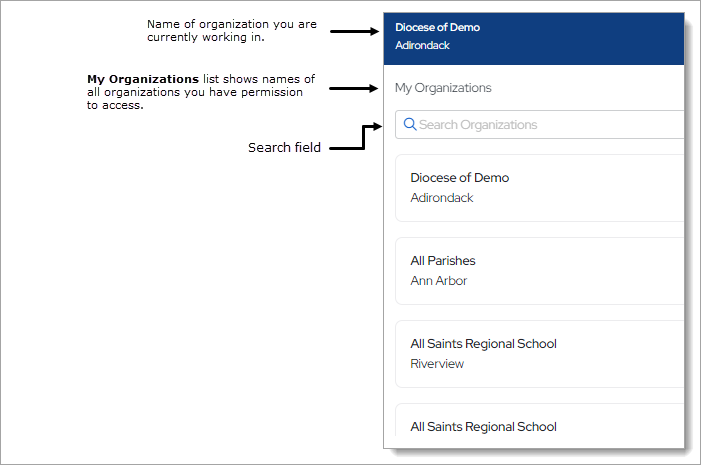
The Organization list is located above the Navigation Bar. By default, this dropdown list is closed and shows the name of the organization you are working in.
- If you have access to one organization, the list displays the name of your organization. The dropdown functionality is disabled because you have limited access.
- If you have access to multiple organizations, the list displays the name of the organization you are working on or last worked in. Select the organization’s name to display a list of all the organizations you have permission to access. If the list is long, you can either type the organization’s name into the Search Organizations field (see illustration below) or use your mouse to scroll through the list to find the organization you want and then select it.
 Help Button
Click  to access the Offering Help. The Help opens in a separate browser so that you can view it while working in the module. The Help provides an
overview of Offering concepts and features and offers step-by-step instructions on how to perform specific Offering tasks.
to access the Offering Help. The Help opens in a separate browser so that you can view it while working in the module. The Help provides an
overview of Offering concepts and features and offers step-by-step instructions on how to perform specific Offering tasks.
 Initials Button
This button shows the initials of the logged-in user. Clicking the button display the Log Out option. Click this option to log out of Offering.

 Toolbar
The Funds toolbar, shown below, spans across the top of the page. The toolbar includes a Search box and a group of buttons that give you quick access to the functions you use most often on the Funds page.

Search Feature
The Search feature provides a quick and easy way to find a fund without having to look through an entire list, which, depending on the number of funds you have, can be pages long. Note that results of searches include only the organization's funds that the logged-in user has permission to access.
In the list below, click an element to view its description.
![]() Information Icon
Information Icon![]() Information Icon
Information Icon
The information icon ![]() appears to the right of the Search box. Place your mouse on the icon (without clicking) to see what type of information
you can search for using the Search box.
appears to the right of the Search box. Place your mouse on the icon (without clicking) to see what type of information
you can search for using the Search box.
Using the Search BoxUsing the Search Box
You can search for a single fund by typing its name into the Search box. You can type the full name or just few characters of the name into the box. Then, click ![]() to start the
search.
to start the
search.
The list refreshes to show you the names of funds matching your search criteria. For example, if a fund is named "Christmas 2009," a search for "Christ," "mas," or even just the letter "C" will produce matches.
After entering your text, click ![]() to start the search.
to start the search.
Toolbar Buttons
In the list below, click the name of a button to view its description.
![]() Manage Permissions by Member
Manage Permissions by Member![]() Manage Permissions by Member
Manage Permissions by Member
Click this button to open the Manage Permission by Member window where you can apply fund permissions to staff. For instructions, go to How to Manage a Staff Member's Fund Access Permissions.
On the right side of the toolbar, two buttons let you change the layout view. Each view has advantages and disadvantages, depending on the device you are using to view your data. Select the view that suits the device, your preference, and style for working:
- Card View
The default layout for fund records is called the Card View. This layout arranges the records in separate containers that resemble index cards. Each card occupies a single row that spans across the page and contains one record. The card gives you an at-a-glance summary of key information in the record.
To enable card view layout, click .
.
Use the Items per page dropdown list at the bottom of the page to select the number of cards to display per page:
- Grid View
The Grid View layout arranges fund records in the form of a table with each record occupying a row. Columns across the top identify the fields in the record (for example, Name and Account #).
To enable card view layout, click .
.
Use the Items per page dropdown list at the bottom of the page to select the number of cards to display per page:
Click ![]() to generate an All Funds List report (Excel file). This report lists all of the funds in your organization that match your filter criteria.
to generate an All Funds List report (Excel file). This report lists all of the funds in your organization that match your filter criteria.
Click .png) Add New Fund to open the Fund Details page where you can add a new fund record. To view explanations of the fields in the fund record, go to
Fields in the Fund Record.
Add New Fund to open the Fund Details page where you can add a new fund record. To view explanations of the fields in the fund record, go to
Fields in the Fund Record.
The filter button ![]() opens and closes the Filters panel. This panel contains filters that you can apply to the Funds list to find records that meet a specific criteria. For descriptions of the filters, go
to Filter Panel.
opens and closes the Filters panel. This panel contains filters that you can apply to the Funds list to find records that meet a specific criteria. For descriptions of the filters, go
to Filter Panel.
![]() You can also click
You can also click  to close the Filter panel.
![]() The system automatically saves your filter and sort settings for the Funds list and retains them as your personal defaults. Even after you log out, the settings remain
the same until you change them. Be aware that your settings are saved on your local device, so if you log in using a different device, you may see different settings.
The system automatically saves your filter and sort settings for the Funds list and retains them as your personal defaults. Even after you log out, the settings remain
the same until you change them. Be aware that your settings are saved on your local device, so if you log in using a different device, you may see different settings.
 Filter Panel
The Filter panel contains filters you can use to narrow down and sort your search results. The Filter ![]() button in the toolbar opens and closes this panel.
button in the toolbar opens and closes this panel.
Filter Buttons
![]() (Search): enter or select your filter criteria in the Filter panel fields, and then click
(Search): enter or select your filter criteria in the Filter panel fields, and then click ![]() to find matching funds.
to find matching funds.
![]() (Clear Search): clears the currently selected criteria from all filters in the Filter panel.
(Clear Search): clears the currently selected criteria from all filters in the Filter panel.
![]() (Close Search): closes the Filter panel.
(Close Search): closes the Filter panel.
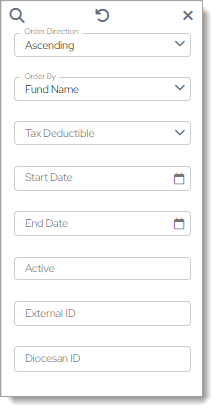
Filters
The Filter panel contains the following filters that you can apply to the Funds grid to narrow down and sort your search results. In the list below, click the name of a filter to view its description.
Order DirectionOrder Direction
Specify the sort order in which to display your results:
- Ascending: sorts alphabetic content from A to Z and numeric content from 0 to 9 (lowest to highest).
- Descending: sorts alphabetic content from A to A and numeric content from 9 to 0 (highest to lowest).
Select the desired field in the fund record on which to sort results:
- Fund Name: name of the fund.
- Fund ID: unique number that identifies the fund in your system.
- Account Number: the unique number that identifies the fund in your organization's chart of accounts.
- Start Date: the date the fund begins accepting gifts (as specified in the Start Date field in the fund record).
- End Date: the date the fund stops accepting gifts (as specified in the End Date field in the fund record).
- Tax Deductible: funds are grouped by their tax-deductible status. Funds accepting non-tax-deductible gifts are listed first followed by those that accept tax-deductible gifts.
- External ID: account number or ID of the fund in an external accounting system (for example, a QuickBooks account number).
- Diocesan ID: account number or ID in the diocesan accounting system.
Select one of the following:
- Yes: shows only those funds that accept tax-deductible gifts.
- No: shows only those funds that do not accept tax-deductible gifts.
Date the fund begins accepting gifts (as specified in the Start Date field in the fund record).
Date the fund stops accepting gifts (as specified in the End Date field in the fund record).
Lets you filter the Funds gird to show active and/or inactive funds. The filter has three settings:
- Blank (the default view): the grid includes both active and inactive funds.
- Yes: the grid includes active funds only. An active fund is one that has the Fund is Active checkbox selected in Fund Details.
- No: the grid includes inactive funds only. An inactive fund is one with the Fund is Active checkbox.
Account number or ID of the fund in an external accounting system (for example, a QuickBooks account number).
Account number or ID in the diocesan accounting system.
 Fund Records
Each record shows the following data pulled from the Fund record. In the list below, click the name of an item to view its description.
![]() To view all the details in a fund record, click its Name link.
To view all the details in a fund record, click its Name link.
Name of the fund. Clicking the link takes you to the fund's record where you can view its details.
Name of the organization that created and owns the fund.
The number of the account that is assigned to the fund in your organization's chart of accounts. For example, if your organization uses ParishSOFT Accounting, Quickbooks, or any other accounting software to manage its finances and accounting, this is the number of the account mapped to the fund.
The date the fund begins accepting gifts.
The date the fund stops accepting gifts.
Specifies whether the fund accepts tax-deductible gifts. If the checkbox is selected, the fund accepts ta