About the Attendance Page
This topic provides quick reference for the elements on the Attendance page, which includes but is not limited information about its links, buttons, input controls, and navigational components. As a quick reference, the topic provides short but useful summaries and descriptions of each element on the page to help you quickly understand its particular function and the tasks you can use it to perform.
This topic provides no instructional information, providing instead links you can follow, if necessary, to obtain detailed step-by step instructions for tasks associated with elements on the page.
In this topic
Overview of the Attendance Page
Showing # - # of # Total Records
Overview of the Attendance Page
The Attendance page lists all of the classes that meet during the selected term. On this page, you can view information for each class, including scheduled meeting dates and attendance counts broken out by status into five categories: Present, Absent, Tardy, Excused, and Online.
The page also contains links to general information about each class (for example, the meeting locations and class size), names of volunteers, and to a list of students where instructors can record their class attendance.
The illustration below identifies the main elements on the Attendance page. Click the link in the illustration to jump to the section on this page that describes the element.
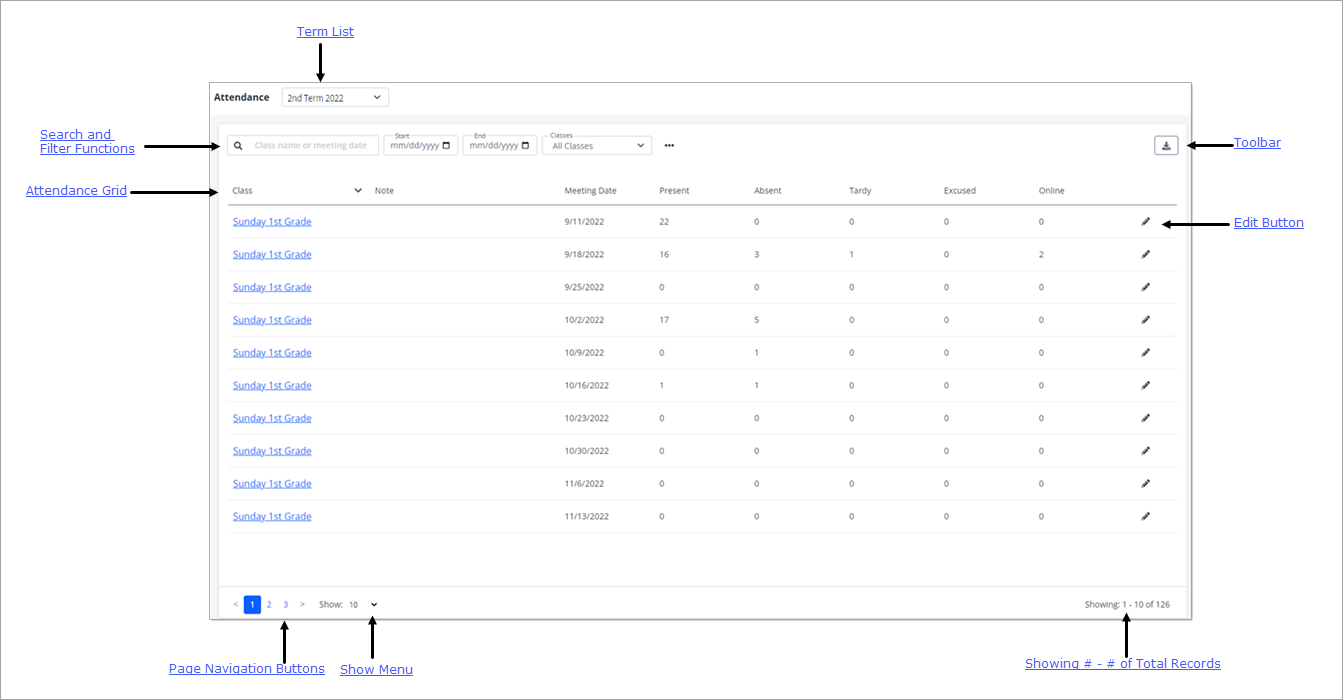
Term List
The Term list contains all of the terms created for your organization's Religious Education program. Select the term you want to work with. By default, the last term you selected is displayed on this page and on all other pages that have a Term dropdown list (for example, the Classes page ).
To display a different term's data, select the term from the list. The selected term becomes the new default selection.
Search Filters
Use the Search function to find specific classes in the grid.
The Search function consists of several filters that you can apply singly or in combination to narrow down a search. The filters are useful for creating specific views of your class data. The filters are listed and described below. Click the name of filter to open it and view its description.
![]() Class name or meeting dateClass name or meeting date
Class name or meeting dateClass name or meeting date
If you know the name of the class you are looking for or its meeting date, type the information into this search field.
Start
End
Classes
Sessions
You can filter the grid based on start and end dates to find classes with meeting times within the date range. In this field, specify a start date by typing a date into the field or clicking ![]() to display a calendar from which you can select the desired start date.
to display a calendar from which you can select the desired start date.
You can filter the grid based on start and end dates to find classes with meeting times within the date range. In this field, specify an end date by typing a date into the field or by clicking ![]() to display a calendar from which you can select the desired end date.
to display a calendar from which you can select the desired end date.
This dropdown lists the classes in the selected term. By default, the filter is set to All Classes. You can filter the list to show data from one or more classes by selecting the desired checkboxes.
Click  to display this filter. This dropdown lists the sessions your organization has created for the selected term. By default,
the filter is set to All Sessions. If desired, you can filter the list to show data for one or more sessions by selecting the desired checkboxes. Click
to display this filter. This dropdown lists the sessions your organization has created for the selected term. By default,
the filter is set to All Sessions. If desired, you can filter the list to show data for one or more sessions by selecting the desired checkboxes. Click  to add the selected sessions to your search criteria.
Click to display this filter. This dropdown lists the departments your organization has created for the selected term. By default,
the filter is set to All Departments. You can filter the list to show data for one or more departments by selecting the desired checkboxes. Click to add the selected departments to your search criteria.

After you select your filters, click this to launch the search. The grid updates with results matching your filter criteria.
Toolbar
The toolbar contains a set of button controls you can use to perform a specific operation on the page.
![]() Download ButtonDownload Button
Download ButtonDownload Button
Click to download an attendance summary report for classes listed in the grid to .csv file. For instructions on downloading this report, go to How to Export an Attendance Summary Report.
Attendance Grid
The Attendance grid lists the classes that meet during the selected term. The grid contains the following columns. In the list below, click the name of column to open it and view its description.
Shows the name of the class. Clicking the name link opens a window that provides details about the class, including its location, number of enrolled students, and names of enrolled students.
Shows the date when the class meets.
Shows the number of students marked as present on the meeting date.
Shows the number of students marked as absent on the meeting date.
Shows the number of students marked as tardy on the meeting date.
Shows the number of students having an excused absence on the meeting date.
Shows the number of students marked as present online on the meeting date.
Click this button to open the class record. In the class record, you can perform these tasks:
View the names of students enrolled in the class
Sorting Attendance DataSorting Attendance Data
Each column in the grid is configured to be sortable. Clicking a column header sorts the sessions in the grid on the value in the selected column. For example, to sort the grid by class name, click the Class column header and to sort by meeting date, click the Meeting Date header.
The sort order on a column is toggled between ascending order (from A to Z; from lowest to highest) and descending order (from Z to A; from highest to lowest). The first time you click a column, the sort direction is ascending. Clicking the column again reverses the sort to descending order.
Page Navigation Buttons
The page buttons at the bottom of the page let you quickly navigate through the grid.
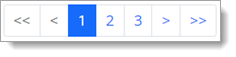
 : click the page number to go directly to the numbered page. For example, clicking 3 takes you to page 3 in the grid.
 : click to go one page back from the page you are currently viewing in the grid.
 : click to go one page forward from the page you are currently viewing in the grid.
 : click to go to the first page in the grid.
 : click to go to the last page in the grid.
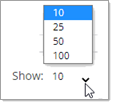
Show Menu
The Show menu lets you choose the maximum number of records to display per page. The default setting is 10 records.
To change the number or records, click  to open the menu. Then, select a value of 25, 50, or 100,
as shown below:
to open the menu. Then, select a value of 25, 50, or 100,
as shown below:
![]() To speed up page loading, select a lower value.
To speed up page loading, select a lower value.
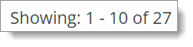
Showing # - # (Total Records)
The bottom right corner of the page shows which records in the grid you are currently viewing out of the total number of records across all pages of the grid. Note that the total record count in the view (Showing # - # range) varies depending on the maximum number of records selected for pagination in the Show Menu.
In the illustration below, the Show menu is set to display 10 records per page, so that is the number the system fetches to display in the grid out of a grand total of 27 records in the grid.
Related Topics
How to Add or Update Attendance Notes
How to Add a Note to a Class Record
How to Enroll a Student in a Class
How to Export an Attendance Summary Report
How to Record Student Attendance